Why You'll Love It
- - Nostalgic pink hue that brightens any table
- - Moist coconut cake that stays tender
- - No gelatin – uses agar‑agar for a veggie‑friendly jam
- - Simple, no‑bake assembly perfect for warm days
*"These cakes took me back to my grandma’s kitchen, every bite feels like a warm memory."*
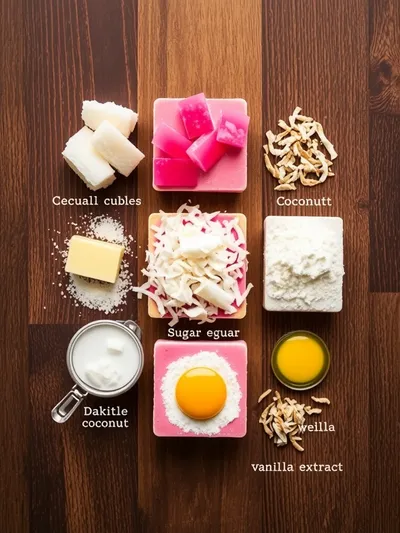
Essential Ingredient Guide
- Coconut milk: Choose full‑fat for richness; shake well before measuring.
- Agar‑agar powder: Acts as the gelatin substitute; dissolve completely in hot liquid.
- Pink food coloring: A few drops give that vintage pastel without overwhelming flavor.
- Caster sugar: Ensures a smooth jam; adjust for sweetness to taste.
- Lemon juice: Adds a subtle acidity that balances the sweet jam.
- Desiccated coconut: Toast lightly for extra aroma or keep raw for a softer crumb.
Complete Cooking Process
-
Ingredient Readiness:
Measure and sift dry ingredients, whisk coconut milk, and have agar‑agar ready.
-
Flavor Development:
Heat the jam mixture until the agar dissolves, allowing the pink hue to deepen.
-
Texture Control:
Fold the coconut into the batter gently to keep the cake airy.
-
Finishing Touches:
Layer the set jelly over the cake, then dust with toasted coconut.
-
Serving Timing:
Allow the assembled cakes to chill for at least 2 hours before slicing.
- Use fresh agar‑agar for a firm set
- Let the jam cool slightly before pouring over cake
- Pat the cake surface dry to avoid sliding
- Serve chilled for the best texture
Pro Tips
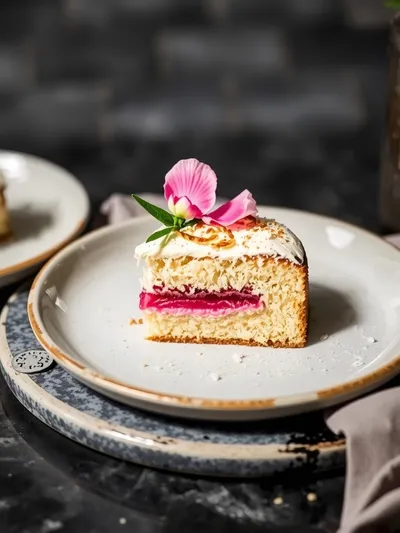
When you’re ready to plate, take a moment to admire the soft pink glow. It’s a little celebration in itself, and the gentle coconut scent will fill the room. A quiet pause before the first bite makes the experience feel even more special.
The essence of the dish:
A fun fact or historical angle:
Flavor or sensory focus:
You Must Know
- Agar‑agar sets faster than gelatin
- Do not over‑mix the batter
- Cool the jam just enough before layering
Frequently Asked Questions
→ Can I use regular gelatin?
Technically yes, but agar‑agar keeps the recipe vegetarian and sets more firmly.
→ How long does the jelly stay set?
In the refrigerator, it remains firm for up to three days.
→ Can I add fresh fruit?
A few sliced strawberries or mangoes pair nicely; just add them after the jelly sets.
→ Is this recipe gluten‑free?
Yes, as long as you use gluten‑free flour for the cake base.
→ What if I don’t have coconut milk?
Full‑fat almond milk works, though the coconut flavor will be milder.
→ Can I freeze the cakes?
Freezing may affect the jelly’s texture; it’s best enjoyed fresh or chilled.
Chef's Tips
Allow the cake to cool completely before adding the jelly; steam can cause the jelly to melt.,If you prefer a brighter hue, add a few more drops of pink coloring.,For a dairy‑free version, replace butter with coconut oil.
Nutrition Facts
per serving
280
Calories
5g
Protein
38g
Carbs
12g
Fat
Taste Profile
A gentle sweet‑tart balance with coconut richness
Ingredient Substitutions
Don't have an ingredient? Try these alternatives
Ensures a light texture; may need a little extra binding.
Pectin requires more sugar and a longer set time.
Recipe Variations
Try these delicious twists on the original
Spicy Version
Add a pinch of ground ginger to the jelly for a warm bite.
Mediterranean Style
Fold finely chopped pistachios into the cake batter and use orange zest in the jelly.
Common Mistakes to Avoid
Learn from others' mistakes for perfect results
- Using too much agar‑agar, resulting in a rubbery jelly.
- Pouring jelly over a warm cake, causing it to melt.
- Over‑mixing batter, which makes the cake dense.
Meal Prep & Storage
Make Ahead Tips
You can bake the cake a day ahead and store it wrapped; assemble with jelly just before serving.
Leftover Ideas
Refrigerate slices in an airtight container; enjoy within three days.
Perfect Pairings
Serve this with...
Cooking Timeline
Preheat oven and prepare dry ingredients.
Mix wet ingredients, combine with dry, and fold in coconut.
Bake cake; cool on rack.
Prepare jelly, dissolve agar‑agar, add color and lemon.
Pour jelly over cooled cake, refrigerate to set.
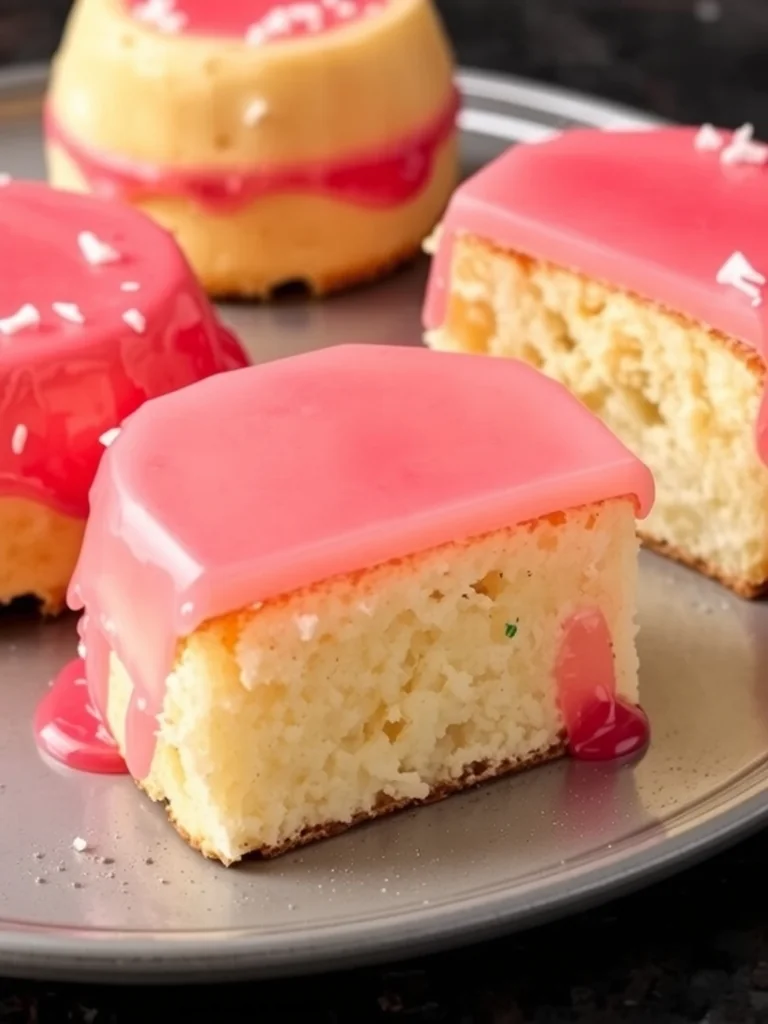
Vintage Australian Pink Jelly Coconut Cakes
Enjoy these vintage Australian pink jelly coconut cakes—moist, tropical treats perfect for any gathering. The gentle shimmer of pink jelly meets the soft coconut crumb, creating a subtle nostalgia that whispers of sunny verandas and afternoon teas. Honestly, the scent alone brings back memories of family celebrations and the quiet hum of the kitchen.
Timing
Prep Time
20 Minutes
Cook Time
15 Minutes
Total Time
35 Minutes
Recipe Details
Ingredients
Cake
- 01 1 ½ cups all‑purpose flour
- 02 ½ cup desiccated coconut, plus extra for topping
- 03 ½ cup caster sugar
- 04 2 tsp baking powder
- 05 ¼ tsp salt
- 06 ½ cup coconut milk
- 07 ¼ cup melted butter
- 08 2 large eggs
- 09 1 tsp vanilla extract
Pink Jelly
- 01 1 cup coconut milk
- 02 ¼ cup caster sugar
- 03 2 tbsp agar‑agar powder
- 04 1 tbsp pink food coloring
- 05 1 tsp lemon juice
Instructions
Preheat the oven to 350°F (180°C). In a bowl sift flour, baking powder, and salt; set aside.
Whisk together sugar, melted butter, eggs, vanilla, and coconut milk until smooth.
Fold the dry ingredients into the wet mixture, then stir in desiccated coconut gently.
Pour batter into a greased 8‑inch round pan and bake for 15‑18 minutes, until golden and springy.
While the cake cools, combine coconut milk, sugar, and agar‑agar in a saucepan; bring to a boil, then simmer 2 minutes.
Stir in pink food coloring and lemon juice, then pour over the cooled cake, spreading evenly.
Refrigerate for at least 2 hours until the jelly is firm. Dust with toasted coconut before serving.
Notes & Tips
- 1 Allow the cake to cool completely before adding the jelly; steam can cause the jelly to melt.
- 2 If you prefer a brighter hue, add a few more drops of pink coloring.
- 3 For a dairy‑free version, replace butter with coconut oil.
Tools You'll Need
-
8‑inch round cake pan
-
Mixing bowls
-
Whisk
-
Sieve
-
Saucepan
-
Rubber spatula
Must-Know Tips
- Don’t over‑beat the batter, it keeps the cake tender.
- Pat the cake surface dry before pouring the jelly to avoid sliding.
- Agar‑agar sets quickly—work efficiently once the jam is ready.
Professional Secrets
- Room‑temperature ingredients blend more evenly.
- Sear the edges of the cake just before baking for a subtle crust.
- Use a silicone brush to spread the jelly smoothly.

Recipe by
Sophia BennettSophia Bennett represents the artistic heart of sweet baking with her elegant cakes, delicate pastries, and celebration desserts. She enjoys crafting ...
Get Delicious Recipes Weekly
Join 25,000+ home cooks getting our best recipes straight to their inbox.
Free forever • No spam • Unsubscribe anytime