Why You'll Love It
- - No‑bake, so you save heat and time
- - Fresh pineapple gives bright, natural sweetness
- - Creamy coconut filling feels luxurious without dairy
- - Easy to slice, store, and share
"These bars taste like a tropical breeze—light, sweet, and just the right amount of creamy. Absolutely delightful!"
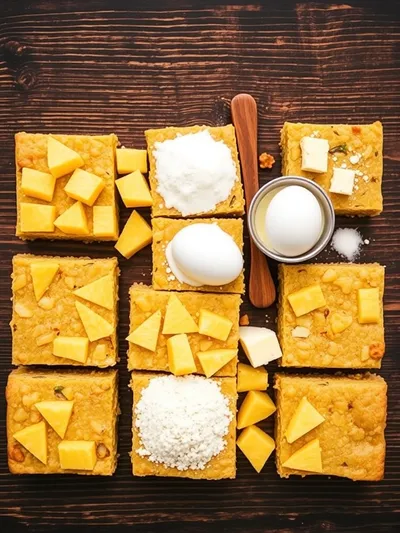
Essential Ingredient Guide
- Fresh pineapple: Choose a ripe, fragrant pineapple; core removed and chopped finely for even texture.
- Coconut cream: Chill a can of coconut milk and scoop the thick cream for richness.
- Butter crust: Use unsalted butter and graham cracker crumbs for a shortbread‑like base.
- Lime zest: A pinch lifts the sweetness and adds a subtle zing.
- Honey: Adds natural sweetness and helps bind the filling.
- Vanilla extract: Just a dash deepens the flavor without overpowering the fruit.
Complete Cooking Process
-
Ingredient Readiness:
Dice pineapple, melt butter, and whisk coconut cream with honey and vanilla until smooth.
-
Flavor Development:
Mix pineapple with lime zest and a touch of honey, letting the aroma bloom.
-
Texture Control:
Press the crumb‑butter mixture firmly into the pan, then chill to set before adding filling.
-
Finishing Touches:
Spread the coconut‑pineapple layer, sprinkle toasted coconut, and chill until firm.
-
Serving Timing:
Slice after at least two hours in the refrigerator for clean cuts and cool bite.
- Use a springform pan for easy removal.
- Pat the pineapple pieces dry to avoid a soggy center.
- Toast the coconut topping lightly for extra crunch.
- Add a drizzle of lime-infused honey just before serving.
Pro Tips
Well, those little details can turn a good bar into a great one. I remember once forgetting to dry the pineapple and ending up with a soggy bottom—oops! So a quick pat with a paper towel makes all the difference. Also, a short chill before slicing helps the bars hold their shape, making plating look tidy and inviting.
The essence of the dish:
A fun fact or historical angle:
Flavor or sensory focus:
You Must Know
- Do not over‑mix the crust, or it becomes dense.
- Let the bars chill long enough for clean cuts.
- Taste the filling before chilling; adjust honey or lime as needed.
Frequently Asked Questions
→ Can I use fresh coconut instead of canned cream?
Yes, you can blend fresh coconut meat with a little water to create a thick cream, though the texture may be slightly coarser.
→ How long can the bars be stored?
Refrigerated in an airtight container for up to four days; they stay moist and flavorful.
→ Can I freeze these bars?
Absolutely—wrap tightly and freeze for up to two months. Thaw in the fridge before serving.
→ What can I substitute for honey?
Maple syrup or agave nectar work well; just use the same amount.
→ Is there a dairy‑free option?
The recipe is already dairy‑free, using coconut cream instead of cream cheese.
→ Can I add a topping?
A sprinkle of toasted coconut flakes or a drizzle of lime‑honey glaze adds extra texture and shine.
Chef's Tips
If the crust feels too dry, add an extra tablespoon of melted butter.,For extra zing, drizzle a little lime‑honey glaze just before serving.,The bars can be made a day ahead; they actually taste better after the flavors meld.
Nutrition Facts
per serving
210
Calories
2g
Protein
25g
Carbs
12g
Fat
Taste Profile
Bright tropical sweetness balanced by creamy coconut.
Ingredient Substitutions
Don't have an ingredient? Try these alternatives
Provides a similar buttery flavor; may need a touch more butter.
Adds a subtle maple note; keep the same quantity.
Recipe Variations
Try these delicious twists on the original
Spicy Version
Add 1/2 tsp ground ginger and a pinch of cayenne for gentle heat.
Mediterranean Style
Swap pineapple for diced figs and garnish with a drizzle of honey and crushed pistachios.
Common Mistakes to Avoid
Learn from others' mistakes for perfect results
- Over‑mixing the crust, making it too dense.
- Skipping the pineapple drying step, leading to a soggy center.
- Not chilling long enough, causing crumbling slices.
Meal Prep & Storage
Make Ahead Tips
You can prepare the crust and filling up to 24 hours ahead; keep them separate and assemble just before chilling.
Leftover Ideas
Reheat gently in a skillet over low heat if you prefer a warm bite, but the bars are delightful cold.
Perfect Pairings
Serve this with...
Cooking Timeline
Prepare crust: combine crumbs, butter, and sugar; press into pan.
Mix filling: whisk coconut cream, honey, vanilla, lime zest.
Fold pineapple and toasted coconut into filling; spread over crust.
Chill bars in refrigerator until firm (at least 2 hours).
Slice and serve chilled, optionally garnish.
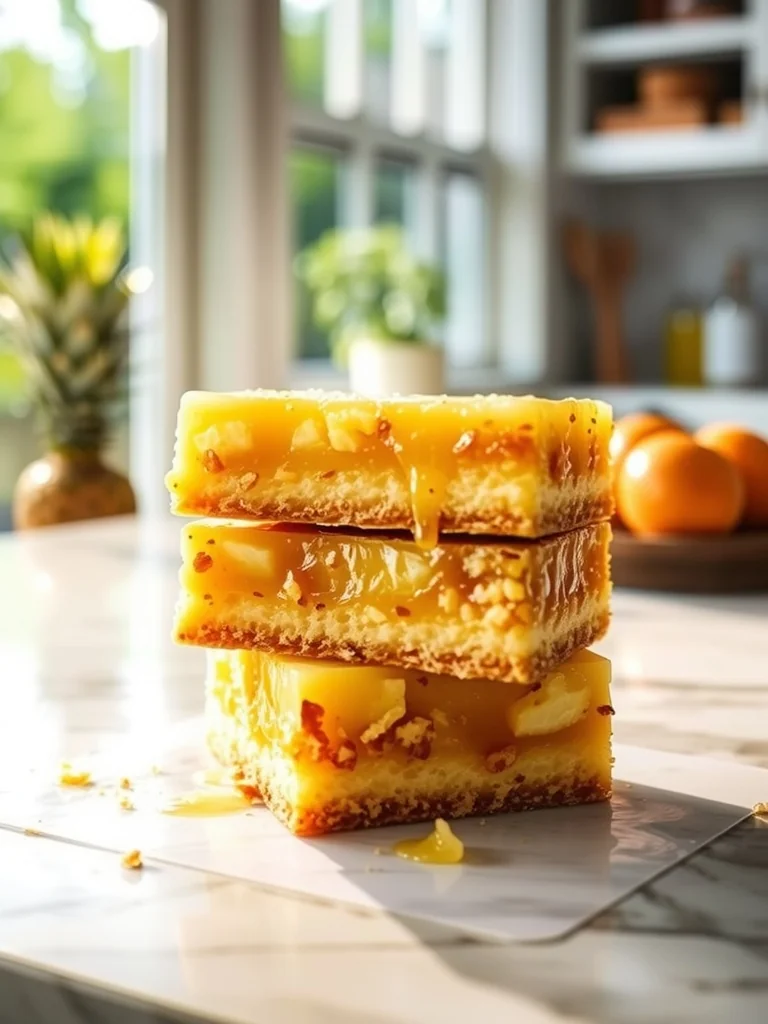
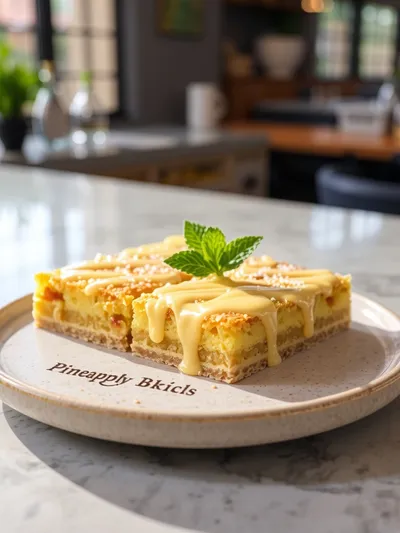
Pineapple Bliss Bars
These pineapple bliss bars are moist, buttery, and packed with bright tropical flavor—perfect for a sunny afternoon or a cozy evening treat.
Timing
Prep Time
20 Minutes
Cook Time
0 Minutes
Total Time
2 Hours 20 Minutes
Recipe Details
Ingredients
Crust
- 01 1 1/2 cups graham cracker crumbs
- 02 1/4 cup melted unsalted butter
- 03 2 tbsp coconut sugar
Filling
- 01 1 1/2 cups fresh pineapple, finely diced
- 02 1 cup coconut cream (the thick part from a chilled can)
- 03 1/4 cup honey
- 04 1 tsp vanilla extract
- 05 1 tsp lime zest
- 06 2 tbsp toasted coconut flakes
Instructions
Press the graham cracker crumbs, melted butter, and coconut sugar together in a 9x9 inch pan, creating an even layer; then refrigerate while you prepare the filling.
In a medium bowl, whisk coconut cream, honey, vanilla, and lime zest until smooth and slightly fluffy.
Gently fold the diced pineapple and toasted coconut into the cream mixture, letting the pineapple’s scent bloom; look, the colors are already inviting.
Spread the pineapple‑coconut filling over the chilled crust, smooth the top, and return to the fridge for at least two hours to set.
Once firm, lift the bars out of the pan, slice with a warm knife for clean edges, and serve chilled.
Notes & Tips
- 1 If the crust feels too dry, add an extra tablespoon of melted butter.
- 2 For extra zing, drizzle a little lime‑honey glaze just before serving.
- 3 The bars can be made a day ahead; they actually taste better after the flavors meld.
Tools You'll Need
-
9x9 inch square pan
-
Food processor (optional for crumbs)
-
Mixing bowls
-
Rubber spatula
-
Sharp knife for slicing
Must-Know Tips
- Don’t over‑mix the crust, or it becomes hard.
- Pat the pineapple dry to avoid soggy spots.
- Chill the crust before adding filling for better stability.
Professional Secrets
- Use the thickest part of canned coconut milk for a rich, velvety filling.
- Press the crust firmly with the back of a measuring cup.
- Allow the bars to rest for at least two hours; this improves sliceability.

Recipe by
Sophia BennettSophia Bennett represents the artistic heart of sweet baking with her elegant cakes, delicate pastries, and celebration desserts. She enjoys crafting ...
Get Delicious Recipes Weekly
Join 25,000+ home cooks getting our best recipes straight to their inbox.
Free forever • No spam • Unsubscribe anytime