Why You'll Love It
- - No oven needed, perfect for hot days
- - Ready in under an hour, minimal cleanup
- - Classic Oreo flavor elevated by rich chocolate
- - Fun to roll and dip, great for kids
"These Oreo balls were a hit at my potluck – everyone kept asking for the recipe!"
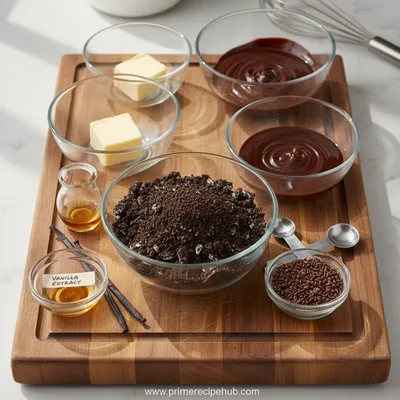
Essential Ingredient Guide
- Oreo cookies: The base of the ball; crush them fine so they bind well with the cream.
- Cream cheese: Provides a tangy richness; use softened cheese for easy mixing.
- Butter: Adds smoothness and helps the mixture hold together.
- Chocolate chips or melting chocolate: Choose good quality dark or milk chocolate for a glossy coat.
- Vanilla extract: A tiny splash brightens the flavor without overpowering.
- Optional sprinkles: Add a pop of color and a subtle crunch on top.
Complete Cooking Process
-
Ingredient Readiness:
Soften the butter, bring cream cheese to room temperature, and crush the Oreos into fine crumbs.
-
Flavor Development:
Mix the crumbs with butter, cream cheese, and vanilla until a smooth dough forms.
-
Texture Control:
Roll the dough into uniform balls; this ensures even coating later.
-
Finishing Touches:
Melt the chocolate, dip each ball, and set on parchment to chill.
-
Serving Timing:
Let the chocolate set completely in the fridge for at least 30 minutes before serving.
- Use a silicone mat for the chocolate to set – it prevents sticking.
- Chill the cookie mixture for 10 minutes before rolling for firmer balls.
- Dip the balls in hot chocolate quickly to avoid a soggy coating.
- Add a pinch of sea salt to the chocolate for a subtle contrast.
Pro Tips
Well, these little tricks make the difference between good and unforgettable. Once the balls are set, you can store them in an airtight container in the fridge for up to three days. Seriously, the texture stays pleasantly soft inside while the outside stays firm and chocolatey. Ugh, I sometimes forget how satisfying it is to see a tray of these glossy treats lined up, each one a tiny promise of sweet comfort. Enjoy them with a cup of tea or as a late‑night indulgence.
The essence of the dish:
A fun fact or historical angle:
Flavor or sensory focus:
You Must Know
- Work quickly when handling melted chocolate.
- Keep the mixture chilled for easy rolling.
- Use parchment paper to prevent sticking.
Frequently Asked Questions
→ Can I use white chocolate instead of dark?
Yes, white chocolate works well; just be sure to melt it gently to avoid scorching.
→ How long can I store the balls?
Keep them refrigerated in an airtight container for up to three days.
→ Can I make them ahead of time?
Absolutely – prepare the balls, coat them, and chill; they’ll be ready when you are.
→ What if I don’t have cream cheese?
You can substitute with mascarpone or a mixture of Greek yogurt and a little butter.
→ Do I need a double boiler for the chocolate?
A microwave works fine; heat in short bursts, stirring in between.
→ Can I add nuts or dried fruit?
Sure, fold finely chopped nuts or dried cherries into the crumb mixture for extra texture.
Chef's Tips
Make sure the butter is not too hot, otherwise the cream cheese can separate.,If the dough feels too sticky, add a few more crushed cookies.,For a richer flavor, use a mix of milk and dark chocolate.
Nutrition Facts
per serving
120
Calories
2g
Protein
13g
Carbs
7g
Fat
Taste Profile
Rich chocolate with a buttery cookie interior
Ingredient Substitutions
Don't have an ingredient? Try these alternatives
Flavor will be slightly different but still works.
Break into pieces before melting for even heat.
Recipe Variations
Try these delicious twists on the original
Spicy Version
Add a pinch of cayenne pepper to the chocolate for a subtle heat.
White Chocolate Coconut
Use white chocolate and roll the balls in toasted coconut flakes.
Common Mistakes to Avoid
Learn from others' mistakes for perfect results
- Over‑mixing the dough, leading to a crumbly texture.
- Letting chocolate cool too much before dipping, causing thick coating.
- Skipping the chilling step, making balls fall apart.
Meal Prep & Storage
Make Ahead Tips
You can prepare the cookie balls and freeze them before dipping. When ready, melt the chocolate and dip for a fresh finish.
Leftover Ideas
Refrigerate leftover balls in a sealed container; they stay moist for a couple of days.
Perfect Pairings
Serve this with...
Cooking Timeline
Crush cookies and gather all ingredients.
Mix crumbs with butter, cream cheese, and vanilla.
Chill mixture, then roll into balls.
Freeze balls briefly while melting chocolate.
Dip balls in chocolate, add toppings, and refrigerate to set.

Oreo Balls – Quick No-Bake Dessert
Indulge in crunchy, chocolate‑coated Oreo balls that are fast to make and perfect for any celebration. The cookies melt into a buttery cream, the chocolate gives a glossy finish, and the whole bite feels like a tiny party in your mouth. Honestly, they’re the kind of treat you can pull together in a quiet evening and still feel proud of.
Timing
Prep Time
15 Minutes
Cook Time
10 Minutes
Total Time
30 Minutes
Recipe Details
Ingredients
Main Ingredients
- 01 2 cups (about 24) Oreo cookies, crushed
- 02 8 oz cream cheese, softened
- 03 4 tbsp unsalted butter, melted
- 04 1 tsp vanilla extract
- 05 12 oz chocolate chips or melting chocolate
Optional Toppings
- 01 Sprinkles, chopped nuts, or sea salt flakes
Instructions
Place the crushed Oreo cookies in a large bowl; I mean, you can use a food processor or a zip‑top bag and a rolling pin.
Add the melted butter, softened cream cheese, and vanilla; mix until a smooth, cohesive dough forms.
Cover the bowl and chill the mixture for about 10 minutes so it firms up.
Using a teaspoon, scoop out portions and roll them between your palms into 1‑inch balls.
Lay the balls on a parchment‑lined tray and place them in the freezer for 15 minutes.
Meanwhile, melt the chocolate in the microwave in 30‑second intervals, stirring each time.
Remove the balls from the freezer; dip each one into the melted chocolate, letting excess drip back.
Return the coated balls to the parchment sheet, sprinkle with optional toppings, and refrigerate until set.
Notes & Tips
- 1 Make sure the butter is not too hot, otherwise the cream cheese can separate.
- 2 If the dough feels too sticky, add a few more crushed cookies.
- 3 For a richer flavor, use a mix of milk and dark chocolate.
Tools You'll Need
-
Food processor or zip‑top bag
-
Rolling pin or meat mallet
-
Mixing bowl
-
Microwave‑safe bowl
-
Parchment paper
-
Spoon or small ice‑cream scoop
Must-Know Tips
- Don't over‑mix the dough; it can become crumbly.
- Let the chocolate set at room temperature if you prefer a softer bite.
- Taste the dough before shaping; adjust sweetness with a pinch of sugar if needed.
Professional Secrets
- Room temperature cream cheese ensures a smooth blend.
- Melting chocolate over short bursts prevents scorching.
- Chilling the balls before dipping keeps the coating even.

Recipe by
Sophia BennettSophia Bennett represents the artistic heart of sweet baking with her elegant cakes, delicate pastries, and celebration desserts. She enjoys crafting ...
Get Delicious Recipes Weekly
Join 25,000+ home cooks getting our best recipes straight to their inbox.
Free forever • No spam • Unsubscribe anytime