Why You'll Love It
- - Easy to assemble, even for beginners
- - Fresh lemon aroma fills the kitchen
- - Perfect portion size for parties
- - Butter crust stays crisp while filling stays creamy
*"These little pies are the perfect balance of tart and sweet; my guests couldn't get enough!"*
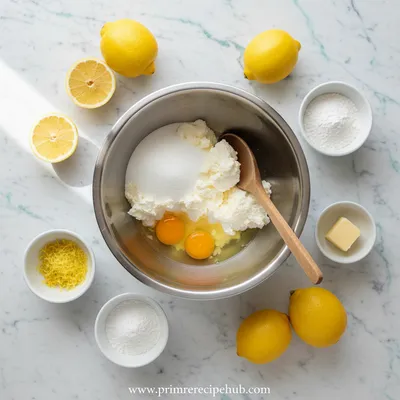
Essential Ingredient Guide
- All‑purpose flour: Provides structure for the crust; sift it to avoid lumps.
- Unsalted butter: Cold butter creates flaky layers; cut into small cubes for even mixing.
- Cream cheese: Forms the rich base of the filling; bring to room temperature for smoothness.
- Lemon zest and juice: Adds bright citrus flavor; zest keeps the aroma lively.
- Granulated sugar: Balances the tartness; adjust slightly if you prefer a sweeter bite.
- Egg yolk: Helps set the filling without making it dense.
Complete Cooking Process
-
Ingredient Readiness:
Measure, sift, and chill the butter and flour; zest and juice the lemons; soften the cream cheese.
-
Flavor Development:
Combine lemon zest with sugar to coax out fragrant oils before mixing into the filling.
-
Texture Control:
Handle the dough gently; over‑mixing can develop gluten and make the crust tough.
-
Finishing Touches:
Brush each pie with a light egg wash for a glossy finish, then sprinkle a touch of powdered sugar.
-
Serving Timing:
Serve the pies slightly warm or at room temperature to showcase the creamy interior.
- Chill the dough for at least 30 minutes before rolling.
- Use a microplane for zest to capture aromatic oils.
- Don’t over‑bake; the filling should wobble slightly when removed.
- Cool pies on a wire rack to keep the crust crisp.
Pro Tips
Well, these little adjustments make a world of difference. When the crust is chilled, it holds its shape better, and the lemon zest really shines through. Also, a quick cool on a rack prevents steam from sogging the bottom, so each bite stays delightfully crisp. Ugh, I once forgot to chill the dough and ended up with a bit of a soggy base—oops! That lesson taught me the value of patience, and now I never skip that step.
The essence of the dish:
A fun fact or historical angle:
Flavor or sensory focus:
You Must Know
- Keep the dough cold for optimal flakiness
- Don’t over‑mix the filling
- Bake just until the edges turn golden
Frequently Asked Questions
→ Can I make the crust ahead of time?
Yes, you can prepare and freeze the crust discs for up to two weeks; just thaw before filling.
→ What if I don’t have fresh lemons?
Use bottled lemon juice for the liquid, but retain zest from a lemon peel or a teaspoon of lemon extract for aroma.
→ How do I avoid a soggy bottom?
Pre‑bake the crust shells for 5 minutes before adding the filling, and cool on a wire rack.
→ Can I substitute the cream cheese?
You can try mascarpone for a richer taste, but adjust sugar as mascarpone is less tangy.
→ Is there a dairy‑free version?
Swap the cream cheese with a firm tofu blend and use coconut oil in the crust for a non‑dairy alternative.
→ What pairs well with these pies?
A light, sparkling white wine or a fresh herbal tea complements the citrus without overwhelming it.
Chef's Tips
Make sure the butter stays cold; warm butter can make the crust tough.,If the filling looks too runny, add a pinch more flour to the crust dough for firmness.,For extra shine, brush the tops with a light egg wash before baking.
Nutrition Facts
per serving
210
Calories
4g
Protein
20g
Carbs
12g
Fat
Taste Profile
Bright and creamy with a balanced tartness
Ingredient Substitutions
Don't have an ingredient? Try these alternatives
Mascarpone yields a richer texture but may need less sugar.
Almond flour changes texture; add a bit more butter to bind.
Recipe Variations
Try these delicious twists on the original
Spicy Version
Add a pinch of cayenne pepper to the crust and a drizzle of honey‑chili glaze on top.
Mediterranean Style
Mix crumbled feta into the crust and garnish with a small rosemary leaf.
Common Mistakes to Avoid
Learn from others' mistakes for perfect results
- Over‑mixing the dough, leading to a tough crust.
- Baking too long, which can dry out the creamy filling.
- Skipping the pre‑bake step, resulting in soggy bottoms.
Meal Prep & Storage
Make Ahead Tips
The crust can be prepared and frozen up to two weeks in advance; fill and bake when ready for a fresh finish.
Leftover Ideas
Reheat gently in a low oven (300°F) for 5‑7 minutes to retain crispness.
Perfect Pairings
Serve this with...
Cooking Timeline
Gather and measure all ingredients; zest and juice lemons.
Make crust dough, chill, and roll out.
Press dough into tins, pre‑bake, and prepare filling.
Fill crusts, bake pies, and let cool.
Dust with powdered sugar, plate, and serve.

Lemon Cheesecake Hand Pies – Sweet Mini Desserts
These bite‑size lemon cheesecake hand pies combine a buttery, golden crust with a silky, tangy lemon cheese filling that whispers of sunshine on the palate. Perfect for tea time, parties, or a quiet evening treat, each tiny pastry delivers a balance of sweet and tart that is both comforting and refreshing.
Timing
Prep Time
20 Minutes
Cook Time
15 Minutes
Total Time
35 Minutes
Recipe Details
Ingredients
Crust
- 01 2 cups all‑purpose flour
- 02 1/2 cup cold unsalted butter, cubed
- 03 2 tbsp granulated sugar
- 04 1/4 tsp salt
- 05 3–4 tbsp ice water
Filling
- 01 8 oz cream cheese, softened
- 02 1/3 cup granulated sugar
- 03 2 tsp lemon zest
- 04 2 tbsp fresh lemon juice
- 05 1 egg yolk
- 06 1 tsp vanilla extract
Instructions
In a bowl, combine flour, sugar, and salt; add cold butter and rub together until crumbs form. Drizzle ice water and mix just until dough comes together. Shape into a disk, wrap, and chill for 30 minutes.
Roll the dough on a lightly floured surface to about 1/8‑inch thickness. Cut circles (about 3‑inch diameter) and gently press into mini muffin tins, creating shallow shells.
Pre‑bake crust shells at 350°F for 5 minutes until barely set. This step keeps them crisp when the filling is added.
Beat cream cheese, sugar, lemon zest, lemon juice, egg yolk, and vanilla until smooth. Spoon the filling into each pre‑baked crust, filling nearly to the top.
Return pies to the oven and bake for 10‑12 minutes, or until the edges are golden and the filling is just set with a slight wobble.
Cool the pies in the tin for 5 minutes, then transfer to a wire rack. Dust lightly with powdered sugar and serve.
Notes & Tips
- 1 Make sure the butter stays cold; warm butter can make the crust tough.
- 2 If the filling looks too runny, add a pinch more flour to the crust dough for firmness.
- 3 For extra shine, brush the tops with a light egg wash before baking.
Tools You'll Need
-
Mini muffin tin
-
Mixing bowls
-
Hand mixer or whisk
-
Rolling pin
-
Pastry cutter or round cookie cutter
-
Wire rack
Must-Know Tips
- Don’t over‑mix the dough – it prevents gluten development.
- Chill the dough before rolling for better handling.
- Taste the filling before baking; adjust sweetness if needed.
Professional Secrets
- Use a microplane for zest to capture aromatic oils.
- Brush the crust with melted butter before baking for extra flavor.
- Cool pies on a wire rack to keep the bottom from steaming.

Recipe by
Sophia BennettSophia Bennett represents the artistic heart of sweet baking with her elegant cakes, delicate pastries, and celebration desserts. She enjoys crafting ...
Get Delicious Recipes Weekly
Join 25,000+ home cooks getting our best recipes straight to their inbox.
Free forever • No spam • Unsubscribe anytime