Why You'll Love It
- - Gluten‑free, yet still light and fluffy
- - Bright patriotic colors that impress without effort
- - Simple frosting technique that stays smooth
- - Versatile for birthdays, holidays, or any celebration
*"The texture was perfect and the frosting so vivid—it felt like a piece of the sky on my plate!"*
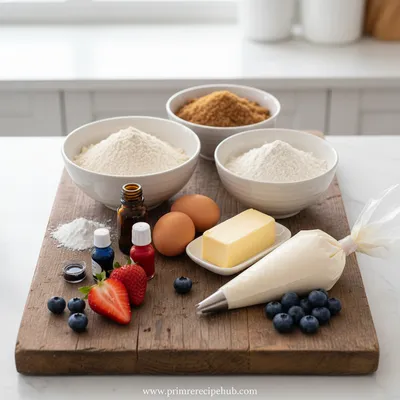
Essential Ingredient Guide
- Gluten‑free all‑purpose flour blend: Choose a fine, starch‑rich blend for a tender crumb; sift twice for extra lightness.
- Almond milk: Provides moisture and a subtle nutty depth without dairy.
- Red and blue gel food coloring: A little goes a long way; add gradually to achieve true flag hues.
- Unsalted butter: Room‑temperature butter creates a smooth, airy buttercream.
- Fresh lemon juice: Adds a bright note that balances the sweetness of the frosting.
- Vanilla bean paste: Gives a fragrant backbone that ties the layers together.
Complete Cooking Process
-
Ingredient Readiness:
Measure dry ingredients, sift flour, and bring butter to room temperature; this ensures even mixing and a light crumb.
-
Flavor Development:
Cream butter and sugar until pale, then add eggs one at a time to incorporate air for a fluffy rise.
-
Texture Control:
Fold in the flour gently, stopping before the batter looks stiff; this keeps the cake tender.
-
Finishing Touches:
Tint the buttercream with gel colors, then spread in smooth stripes to form the flag.
-
Serving Timing:
Allow the cake to cool completely before frosting; serve within a few hours for optimal freshness.
- Use a kitchen scale for precise flour measurement.
- Chill the cake layers 10 minutes before frosting for cleaner edges.
- Apply a crumb coat first, then chill again for a flawless finish.
- Swap almond milk for oat milk if you prefer a milder flavor.
Pro Tips
Well, those little adjustments make a world of difference. I remember a time when I rushed the crumb coat and the flag looked fuzzy—oops! Now I let each layer rest, and the colors stay bright, the texture stays soft. Taking those pauses lets the cake settle, and the result feels like a quiet celebration on a plate.
The essence of the dish:
A fun fact or historical angle:
Flavor or sensory focus:
You Must Know
- Gluten‑free flour can behave differently; sift well.
- Gel colors stay vivid without watering down the buttercream.
- Allow the cake to cool fully before frosting to avoid melting.
Frequently Asked Questions
→ Can I use a different flour blend?
Yes, a 1‑to‑1 gluten‑free all‑purpose blend works, but make sure it contains xanthan gum for structure.
→ How do I keep the frosting from melting?
Keep the cake refrigerated until just before serving; the buttercream stays firm up to 2 hours at room temperature.
→ Is there a dairy‑free version?
Swap butter for dairy‑free margarine and use coconut cream in the frosting; the texture remains rich.
→ Can I make mini flag cupcakes?
Absolutely—use a muffin tin, bake 18‑20 minutes, and frost each with a small flag design.
→ What’s the best way to store leftovers?
Cover loosely with parchment and store in the fridge; the cake stays moist for 3 days.
→ How far ahead can I bake the layers?
Bake up to 2 days ahead; wrap each layer tightly in plastic and freeze if needed.
Chef's Tips
If the buttercream looks too thick, add a teaspoon of almond milk at a time.,For sharper color, let the gel colors sit for a minute before mixing.,You can add edible glitter to the white stripe for a subtle sparkle.
Nutrition Facts
per serving
420
Calories
5g
Protein
55g
Carbs
22g
Fat
Taste Profile
Brightly sweet with a citrus lift
Ingredient Substitutions
Don't have an ingredient? Try these alternatives
Choose a brand with a neutral flavor; the texture remains creamy.
Oat milk adds a slight sweetness; reduce sugar if needed.
Recipe Variations
Try these delicious twists on the original
Spicy Version
Add a pinch of cayenne to the red frosting for a subtle heat that surprises the palate.
Mediterranean Style
Swap vanilla for orange zest and garnish with toasted almond slivers for a sunny twist.
Common Mistakes to Avoid
Learn from others' mistakes for perfect results
- Over‑mixing the batter, leading to a dense crumb.
- Adding too much liquid when tinting colors, causing runny frosting.
- Skipping the crumb coat, which can make the final frosting look uneven.
Meal Prep & Storage
Make Ahead Tips
You can bake the layers up to 24 hours ahead, wrap tightly, and store them in the freezer. Thaw overnight in the fridge before frosting.
Leftover Ideas
Refrigerate leftovers and enjoy a slice with a cup of tea; the cake stays moist for several days.
Perfect Pairings
Serve this with...
Cooking Timeline
Gather and measure all ingredients; preheat oven.
Cream butter and sugar, add eggs and flavorings.
Combine wet and dry ingredients, pour batter into pans.
Bake cakes, cool, and prepare buttercream while they rest.
Tint buttercream, assemble layers, and pipe flag design.
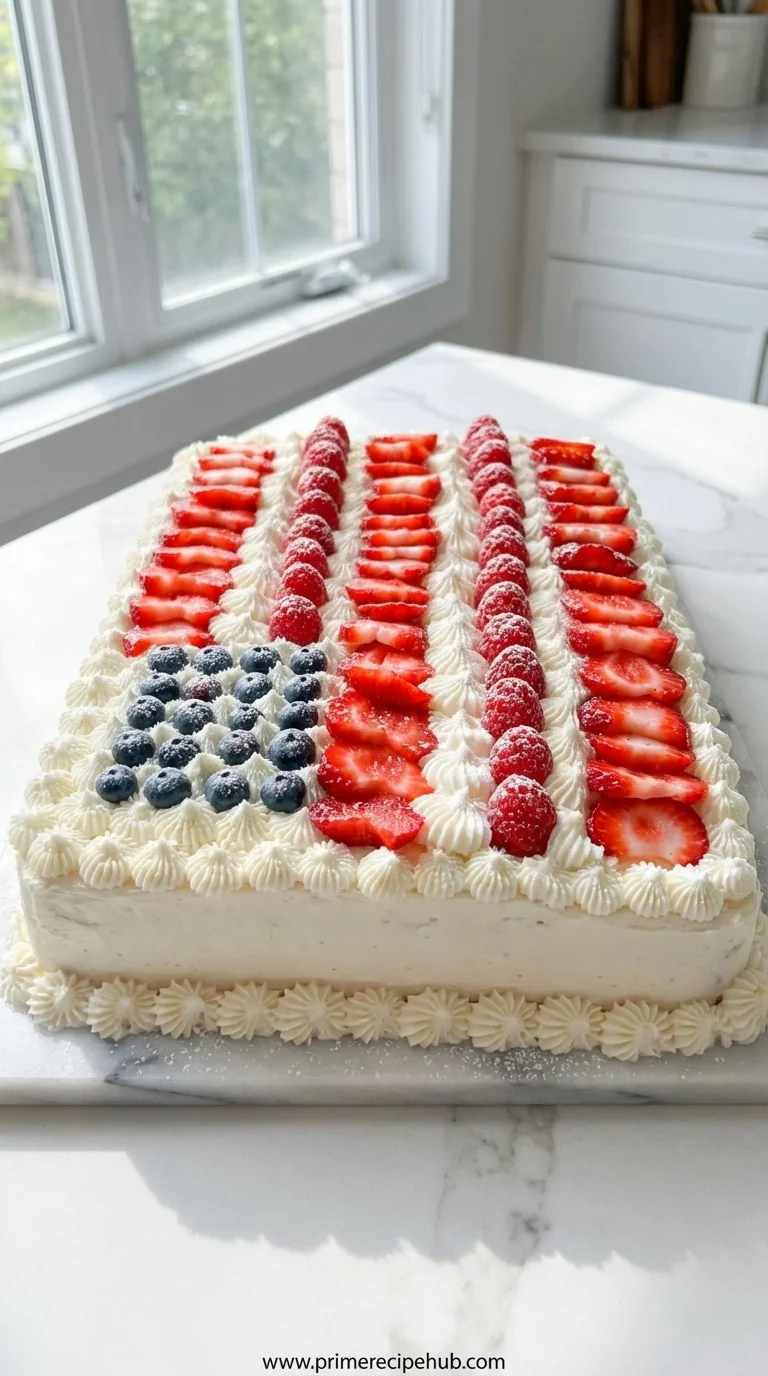
Gluten-Free American Flag Cake
Celebrate Independence Day with a stunning gluten‑free American flag cake. Fluffy vanilla layers are brushed with a light buttercream and dressed in vibrant red, white, and blue frosting that looks like a flag unfurling under summer sunshine.
Timing
Prep Time
30 Minutes
Cook Time
25 Minutes
Total Time
55 Minutes
Recipe Details
Ingredients
Cake Layers
- 01 2 1/2 cups gluten‑free all‑purpose flour blend
- 02 1 1/2 tsp baking powder
- 03 1/2 tsp baking soda
- 04 1/4 tsp salt
- 05 1 cup unsalted butter, softened
- 06 1 1/2 cups granulated sugar
- 07 4 large eggs, room temperature
- 08 1 tsp vanilla bean paste
- 09 1 cup almond milk
- 10 2 tbsp fresh lemon juice
Buttercream Frosting
- 01 1 cup unsalted butter, softened
- 02 4 cups powdered sugar, sifted
- 03 2 tbsp almond milk
- 04 1 tsp vanilla bean paste
- 05 Red gel food coloring
- 06 Blue gel food coloring
Instructions
Preheat the oven to 350°F (175°C). Grease three 8‑inch round cake pans and line the bottoms with parchment. flag cake lovers often start here.
In a bowl whisk together the gluten‑free flour, baking powder, baking soda, and salt; set aside.
In a large mixing bowl, cream the butter and sugar until pale and fluffy, about 3–4 minutes. Add eggs one at a time, beating well after each, then stir in vanilla and lemon juice.
Gradually add the dry ingredients, alternating with almond milk, beginning and ending with the flour mixture. Mix just until combined; over‑mixing can toughen the crumb.
Divide the batter evenly among the prepared pans. Bake for 20‑22 minutes, or until a toothpick inserted in the center comes out clean.
Let the cakes cool in the pans for 10 minutes, then turn out onto wire racks to cool completely.
While the cakes cool, prepare the buttercream: beat butter until creamy, then add powdered sugar a cup at a time, mixing on low. Add almond milk and vanilla, beat until light and fluffy.
Divide the buttercream into three portions. Tint one portion deep red and another deep blue using gel colors; keep the third portion white.
Place the first cake layer on a serving plate, spread a thin coat of white buttercream (crumb coat), then chill 10 minutes. Repeat with the second layer.
Top with the third layer, apply a generous layer of white buttercream over the entire cake. Using a spatula, pipe a bold red stripe across the top, then a blue stripe beside it, leaving a white stripe in the middle to resemble the flag.
Finish with a light dusting of powdered sugar if desired. Serve chilled and enjoy the patriotic pride in each slice.
Notes & Tips
- 1 If the buttercream looks too thick, add a teaspoon of almond milk at a time.
- 2 For sharper color, let the gel colors sit for a minute before mixing.
- 3 You can add edible glitter to the white stripe for a subtle sparkle.
Tools You'll Need
-
Three 8‑inch round cake pans
-
Mixer (stand or hand)
-
Spatula
-
Piping bag and tips for stripes
-
Sifter
-
Wire cooling rack
Must-Know Tips
- Don’t over‑mix the batter, it can make the cake dense.
- Chill each layer before frosting to avoid sliding.
- Taste the frosting and adjust sweetness with extra powdered sugar if needed.
Professional Secrets
- Room‑temperature butter yields a smoother buttercream.
- Sifting powdered sugar eliminates lumps for a silkier finish.
- Gel colors stay vivid without watering down the frosting.

Recipe by
Sophia BennettSophia Bennett represents the artistic heart of sweet baking with her elegant cakes, delicate pastries, and celebration desserts. She enjoys crafting ...
Get Delicious Recipes Weekly
Join 25,000+ home cooks getting our best recipes straight to their inbox.
Free forever • No spam • Unsubscribe anytime