Why You'll Love It
- - A satisfying crunchy exterior with a tender interior
- - Sweet‑garlic glaze that isn’t cloying
- - Ready in under an hour for busy weeknights
- - Versatile: serve with rice, noodles, or a simple salad
*"The first bite made me sigh – crispy outside, juicy inside, sweet and garlicky perfection!"*
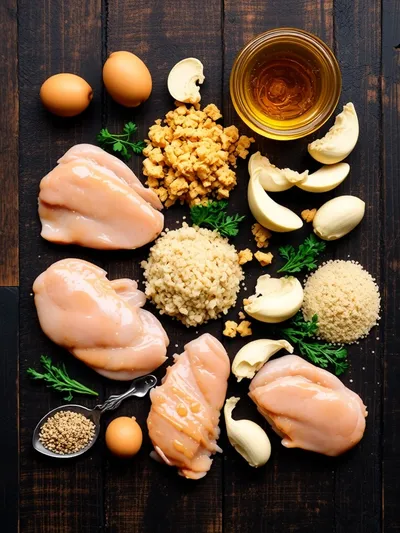
Essential Ingredient Guide
- Chicken breasts: Choose fresh, skinless breasts; pat dry for optimal crispness
- Panko breadcrumbs: Provides the double crunch; toast lightly before using for extra flavor
- Honey: Adds natural sweetness and helps caramelize the crust
- Garlic: Fresh minced garlic gives the familiar aromatic backbone
- Lemon juice: A splash brightens the glaze and balances the honey
- Soy sauce (low‑sodium): Adds depth; a little goes a long way
Complete Cooking Process
-
Ingredient Readiness:
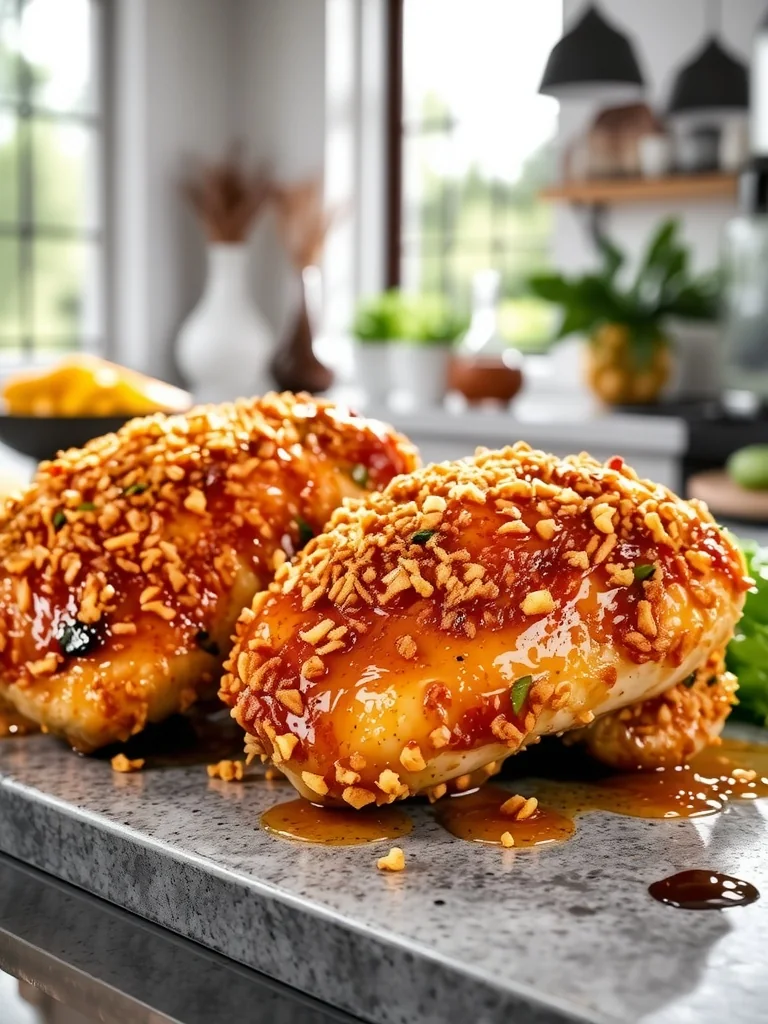
Season the chicken, coat with flour, egg, then twice with panko for that layered crunch.
-
Flavor Development:
Sear the coated breasts until golden, then finish in the oven while the honey‑garlic glaze simmers.
-
Texture Control:
Avoid overcrowding the pan; bake the chicken on a wire rack so steam can escape, keeping the crust crisp.
-
Finishing Touches:
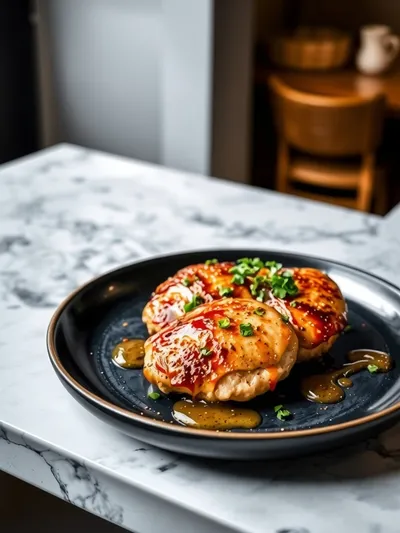
Drizzle the glossy glaze over the chicken just before serving, letting it pool slightly.
-
Serving Timing:
Serve immediately while the coating is still crunchy, paired with a fresh side.
- Let the coated chicken rest 10 minutes before searing – it helps the crust adhere.
- Use a light hand with the glaze; too much can make the coating soggy.
- If you like a hint of heat, add a pinch of crushed red pepper to the glaze.
Pro Tips
Well, these little adjustments make a world of difference. I’ve found that the brief rest lets the flour‑egg‑panko layers settle, so you get that perfect snap. And a whisper of red pepper? It’s just enough to make the palate notice without stealing the sweet‑garlic spotlight. Honestly, these tips turn a good dinner into a memorable one.
The essence of the dish:
A fun fact or historical angle:
Flavor or sensory focus:
You Must Know
- Keep the oil hot but not smoking
- Pat chicken dry for a better seal
- Finish with a squeeze of lemon for brightness
Frequently Asked Questions
→ Can I use thighs instead of breasts?
Yes, boneless, skinless thighs work well; just increase cooking time by a few minutes.
→ What if I don’t have panko?
Use regular breadcrumbs or crushed cornflakes for a similar crunch.
→ Is there a gluten‑free version?
Swap the flour and breadcrumbs for gluten‑free alternatives; the texture stays delightful.
→ How do I store leftovers?
Refrigerate in an airtight container for up to 3 days; reheat in a skillet to revive the crust.
→ Can I add vegetables to the pan?
Absolutely – broccoli or snap peas add color and texture, just add them after searing the chicken.
→ What side pairs best?
A simple rice pilaf, quinoa, or a crisp green salad complements the sweet‑savory notes.
Chef's Tips
If you prefer a milder sweetness, reduce honey to 3 tbsp.,For a hint of spice, stir in a pinch of cayenne with the glaze.,Make sure the chicken is patted dry before coating to avoid a soggy crust.
Nutrition Facts
per serving
420
Calories
38g
Protein
35g
Carbs
14g
Fat
Taste Profile
A harmonious blend of sweet honey and garlicky depth with a satisfying crunch.
Ingredient Substitutions
Don't have an ingredient? Try these alternatives
Adjust cooking time for tofu – press well and crisp on both sides.
Slightly sweeter; reduce honey a teaspoon if needed.
Recipe Variations
Try these delicious twists on the original
Spicy Version
Add ½ tsp crushed red pepper flakes to the glaze and finish with a drizzle of sriracha.
Mediterranean Style
Stir in chopped olives and sun‑dried tomatoes into the glaze, and garnish with crumbled feta.
Common Mistakes to Avoid
Learn from others' mistakes for perfect results
- Overcrowding the pan, which creates steam and softens the crust.
- Applying too much glaze before baking – it can make the coating soggy.
- Not letting the chicken rest after coating, leading to a crumbly exterior.
Meal Prep & Storage
Make Ahead Tips
You can marinate the chicken in a pinch of salt and pepper for up to 24 hours; coat and sear fresh when ready to serve.
Leftover Ideas
Reheat gently in a skillet over medium heat, adding a splash of broth to revive the crust.
Perfect Pairings
Serve this with...
Cooking Timeline
Season and set up dredging station; coat chicken.
Sear coated chicken on both sides until golden.
Prepare and reduce the honey‑garlic glaze.
Bake chicken with glaze, ensuring internal temperature is reached.
Rest, drizzle extra glaze, and plate.
Double Crunch Honey Garlic Chicken Breasts
Crispy double‑crunch honey garlic chicken breasts that balance sweet, savory, and buttery textures, ready in under an hour for a comforting night‑in.
Timing
Prep Time
15 Minutes
Cook Time
25 Minutes
Total Time
40 Minutes
Recipe Details
Ingredients
Main Ingredients
- 01 4 boneless skinless chicken breasts, pounded to even thickness
- 02 1 cup all‑purpose flour
- 03 2 large eggs, beaten
- 04 1 ½ cups panko breadcrumbs
- 05 ½ cup grated Parmesan cheese
- 06 2 tbsp olive oil for searing
For the Sauce
- 01 ¼ cup honey
- 02 3 tbsp soy sauce
- 03 2 tbsp apple cider vinegar
- 04 3 cloves garlic, minced
- 05 1 tsp lemon juice
- 06 ½ tsp ground black pepper
Instructions
Season the chicken breasts with salt and pepper, then set up a dredging station: flour, beaten eggs, and a mixture of panko and Parmesan.
Press each piece into flour, shake off excess, dip into egg, then coat generously with the breadcrumb mix. For extra crunch, double‑coat by repeating the egg and breadcrumb steps.
Heat olive oil in a large skillet over medium‑high heat. Add the coated chicken and sear 3‑4 minutes per side, until golden brown.
While the chicken rests, whisk honey, soy sauce, vinegar, garlic, lemon juice, and pepper in a small saucepan. Simmer gently for 3‑4 minutes until slightly thickened.
Transfer the seared chicken to a baking sheet, brush generously with the honey‑garlic glaze, and finish in a pre‑heated 375°F oven for 10‑12 minutes, or until internal temperature reaches 165°F.
Remove from oven, let rest a couple of minutes, then drizzle any remaining glaze over the tops. Serve immediately.
Notes & Tips
- 1 If you prefer a milder sweetness, reduce honey to 3 tbsp.
- 2 For a hint of spice, stir in a pinch of cayenne with the glaze.
- 3 Make sure the chicken is patted dry before coating to avoid a soggy crust.
Tools You'll Need
-
Large skillet
-
Shallow dishes for dredging
-
Baking sheet with wire rack
-
Small saucepan
-
Tongs
-
Measuring spoons
Must-Know Tips
- Don’t overcrowd the pan – it lowers the temperature and softens the crust.
- Let the coated chicken rest briefly before searing to help the coating adhere.
- Taste the glaze before adding to the chicken; adjust salt or sweetness as needed.
Professional Secrets
- Room temperature chicken cooks more evenly, preventing a cold center.
- A quick splash of vinegar in the glaze brightens the honey’s depth.
- Using a wire rack in the oven allows air circulation, keeping the crust crisp.

Recipe by
Emily CarterEmily Carter is known for transforming classic chicken dishes into comforting baked creations. She specializes in oven-roasted chicken meals, savory c ...
Get Delicious Recipes Weekly
Join 25,000+ home cooks getting our best recipes straight to their inbox.
Free forever • No spam • Unsubscribe anytime