Why You'll Love It
- - Two textures in one pan, soft mousse and dense brownie
- - Simple pantry ingredients you already have
- - Elegant enough for guests, casual for weeknights
- - Makes the kitchen smell like a boutique chocolatier
*"The mousse layer is like a cloud, and the brownie underneath is pure comfort."*
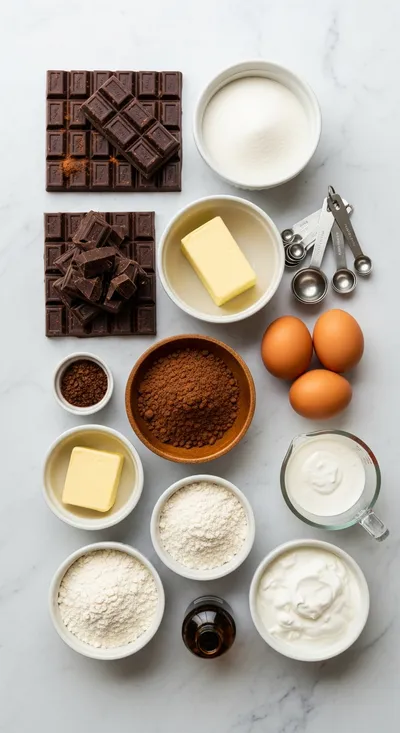
Essential Ingredient Guide
- Dark chocolate: Choose 70% cacao for depth; melt slowly to avoid grainy texture.
- Egg whites: Whisk to soft peaks; they give the mousse its airy lift.
- Butter: Adds richness to the brownie base and helps create a glossy crust.
- Sugar: Granulated sugar balances bitterness and aids caramelization.
- Lemon zest: A hint of citrus brightens the chocolate without overpowering.
- Vanilla extract: Adds warmth; a teaspoon is enough to round the flavors.
Complete Cooking Process
-
Ingredient Readiness:
Measure all dry ingredients, melt chocolate with butter, and separate eggs. Having everything at room temperature ensures a smooth batter.
-
Flavor Development:
Combine melted chocolate with sugar and butter, then fold in the airy whipped egg whites – that’s where the mousse takes shape.
-
Texture Control:
Spread batter evenly; avoid over‑mixing after adding flour to keep the brownie tender yet fudgy.
-
Finishing Touches:
After baking, let the pan rest; the mousse will set slightly while the brownie continues to firm up.
-
Serving Timing:
Cool completely, then cut squares. Serve slightly warm for melt‑in‑your‑mouth goodness.
- Use a silicone spatula to fold gently – prevents deflating the mousse.
- Line the pan with parchment for easy removal.
- Store in the fridge; the mousse stays silky, not dry.
- Reheat a slice briefly in the microwave for a molten center.
Pro Tips
Well, after you’ve mastered these steps, you’ll notice how each bite carries a gentle snap of the crust followed by a melt‑away mousse. It’s a quiet celebration of chocolate that feels personal, like a secret you share with family. I mean, the simplicity of the process lets the flavors shine without any flashy tricks.
The essence of the dish:
A fun fact or historical angle:
Flavor or sensory focus:
You Must Know
- Do not over‑beat the mousse; keep it airy.
- Use high‑quality chocolate for depth.
- Allow the brownies to cool before cutting.
Frequently Asked Questions
→ Can I make this gluten‑free?
Yes, substitute the all‑purpose flour with a 1‑to‑1 gluten‑free blend; the texture remains tender.
→ How long can I store leftovers?
Keep them in an airtight container in the refrigerator for up to three days; the mousse stays creamy.
→ Can I freeze these brownies?
Absolutely—wrap tightly and freeze for up to two months. Thaw in the fridge before serving.
→ What if I don’t have a stand mixer?
A hand‑whisk works fine; just give the egg whites a little extra time to reach soft peaks.
→ Is there a dairy‑free version?
Swap butter for a good quality coconut oil and use a dairy‑free chocolate.
→ Can I add nuts?
Chopped walnuts or hazelnuts add a pleasant crunch; fold them in after the batter is mixed.
Chef's Tips
If the mousse seems too runny, let it sit a few minutes; it will firm up as it cools.,For extra shine, drizzle a thin stream of melted chocolate just before serving.,You can sprinkle a pinch of sea salt on top for a subtle contrast.
Nutrition Facts
per serving
320
Calories
5g
Protein
35g
Carbs
18g
Fat
Taste Profile
Rich chocolate with a buttery finish
Ingredient Substitutions
Don't have an ingredient? Try these alternatives
Will be sweeter; reduce added sugar slightly.
Works well for a vegan version, but mousse may be less firm.
Recipe Variations
Try these delicious twists on the original
Spicy Version
Add a pinch of cayenne and a drizzle of sriracha for a subtle heat.
Mediterranean Style
Stir in crumbled feta and chopped olives after baking for a savory twist.
Common Mistakes to Avoid
Learn from others' mistakes for perfect results
- Over‑beating the mousse, which makes it dense.
- Baking brownies too long; they become dry.
- Spreading mousse before the brownie layer is warm enough, causing sinking.
Meal Prep & Storage
Make Ahead Tips
You can bake the brownie base a day ahead, let it cool, then store wrapped in the fridge. Add the mousse and chill just before serving.
Leftover Ideas
Reheat a slice gently in a skillet over low heat; the mousse will become luxuriously molten again.
Perfect Pairings
Serve this with...
Cooking Timeline
Preheat oven and line pan; melt butter and chocolate.
Mix brownie batter, spread in pan, and bake.
Prepare mousse: beat whites, add sugar, fold in melted chocolate.
Spread mousse over hot brownies, smooth surface.
Cool, refrigerate, then cut and serve.
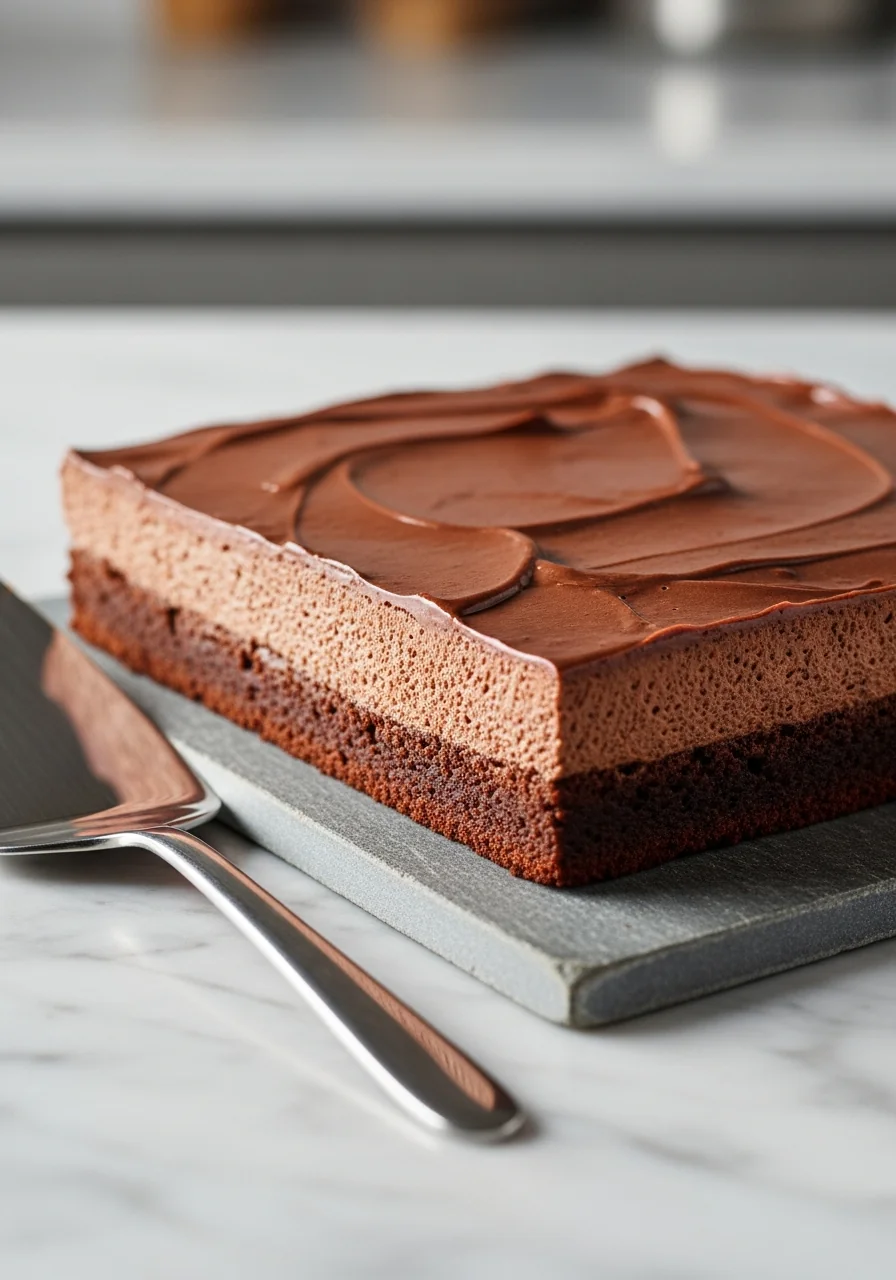
Chocolate Mousse Brownies – Creamy Decadent Dessert
Indulge in rich Chocolate Mousse Brownies with a silky mousse layer atop a fudgy, almost caramel‑like base—perfect for any chocolate lover seeking comfort and a touch of elegance.
Timing
Prep Time
20 Minutes
Cook Time
30 Minutes
Total Time
50 Minutes
Recipe Details
Ingredients
For the Brownie Base
- 01 1/2 cup (115g) unsalted butter, melted
- 02 8 oz (225g) dark chocolate, chopped
- 03 1 cup (200g) granulated sugar
- 04 2 large eggs
- 05 1 tsp vanilla extract
- 06 3/4 cup (95g) all‑purpose flour
- 07 1/4 tsp salt
For the Chocolate Mousse
- 01 4 large egg whites
- 02 1/4 tsp cream of tartar
- 03 1/3 cup (70g) powdered sugar
- 04 6 oz (170g) dark chocolate, melted and cooled
- 05 1 tsp lemon zest
Instructions
Preheat the oven to 350°F (175°C). Line a 9×13‑inch baking pan with parchment; this will make removal easy.
In a saucepan over low heat, melt butter and dark chocolate together, stirring gently until smooth. Remove from heat and let cool slightly.
Whisk sugar into the chocolate mixture, then stir in eggs one at a time, followed by vanilla. Fold in flour and salt just until combined.
Spread the brownie batter evenly in the prepared pan. Bake for 12‑15 minutes, just until the edges set but the center still looks slightly soft.
While the brownies bake, start the mousse: in a clean bowl, beat egg whites with cream of tartar until soft peaks form. Gradually add powdered sugar and continue beating to stiff peaks.
Fold a third of the whipped whites into the cooled melted chocolate to lighten it, then gently incorporate the remaining whites, preserving the airy texture.
When the brownies are done, remove from oven and immediately spread the chocolate mousse over the hot surface, smoothing with a spatula.
Allow the pan to cool to room temperature, then refrigerate for at least 2 hours so the mousse sets. Cut into squares and serve.
Notes & Tips
- 1 If the mousse seems too runny, let it sit a few minutes; it will firm up as it cools.
- 2 For extra shine, drizzle a thin stream of melted chocolate just before serving.
- 3 You can sprinkle a pinch of sea salt on top for a subtle contrast.
Tools You'll Need
-
9×13‑inch baking pan
-
Parchment paper
-
Heat‑proof saucepan
-
Whisk or electric mixer
-
Silicone spatula
-
Sharp knife
Must-Know Tips
- Don’t over‑mix the brownie batter; it keeps the crumb tender.
- Fold the mousse gently to retain air, otherwise it becomes dense.
- Cool the brownie layer slightly before adding mousse to prevent melting.
Professional Secrets
- Use a double‑boiler for melting chocolate; prevents scorching.
- Sift flour into the batter for a lighter crumb.
- Chill the pan briefly after baking; this helps the mousse set evenly.

Recipe by
Sophia BennettSophia Bennett represents the artistic heart of sweet baking with her elegant cakes, delicate pastries, and celebration desserts. She enjoys crafting ...
Get Delicious Recipes Weekly
Join 25,000+ home cooks getting our best recipes straight to their inbox.
Free forever • No spam • Unsubscribe anytime