Why You'll Love It
- - Simple ingredients you already have in the pantry
- - No‑bake color mixing keeps it quick and fun
- - Soft interior with a lightly crisp edge
- - Perfect for packing in lunchboxes or gifting
*"These cookies stole the show at our backyard BBQ—crisp, colorful, and just the right amount of sweet!"*
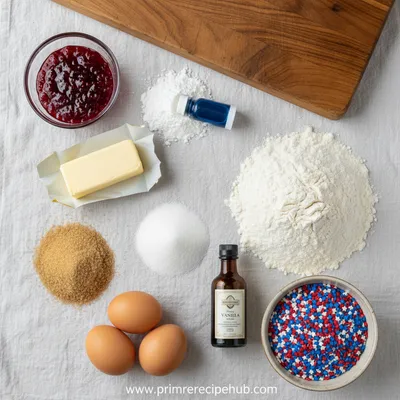
Essential Ingredient Guide
- All‑purpose flour: Provides structure; sift it for a tender crumb
- Unsalted butter: Use softened butter for easy creaming, adds richness
- Powdered sugar: Creates a smooth dough and subtle sweetness
- Natural food coloring (red and blue): A few drops give vivid hues without altering flavor
- Lemon zest: Adds a bright citrus note that lifts the sweet base
- Vanilla extract: A little goes a long way to deepen the aroma
Complete Cooking Process
-
Ingredient Readiness:
Measure out flour and butter, let the butter sit at room temperature for easy creaming.
-
Flavor Development:
Cream butter and sugar until pale, then fold in zest and vanilla for aromatic depth.
-
Texture Control:
After adding flour, chill the dough briefly; this helps maintain shape during baking.
-
Finishing Touches:
Split the dough, tint each portion, roll into logs, and slice just before baking.
-
Serving Timing:
Serve warm or at room temperature; they stay soft for a day if stored airtight.
- Dust your work surface with flour to prevent sticking
- Use a sharp cookie cutter for clean edges
- Rotate the pan halfway through baking for even color
- Cool cookies on a wire rack to keep the bottom crisp
Pro Tips
Well, these little details make a world of difference. I remember once I over‑mixed the dough and the cookies turned dense – oops! Learning to stop when the flour just disappears keeps them light. Also, a quick pause between tinting and chilling helps the colors settle, so they don’t bleed into each other. Enjoy the process; the scent of butter and sugar rising in the oven is a quiet celebration in itself.
The essence of the dish:
A fun fact or historical angle:
Flavor or sensory focus:
You Must Know
- Do not over‑mix after adding flour
- Chill dough for at least 20 minutes
- Use parchment paper to prevent sticking
Frequently Asked Questions
→ Can I make these cookies gluten‑free?
Yes, substitute the all‑purpose flour with a 1‑to‑1 gluten‑free blend; the texture will remain tender.
→ How long can I store the cookies?
Keep them in an airtight container for up to five days; they stay soft at room temperature.
→ What natural coloring can I use?
Beet juice for red and blueberry puree (strained) for blue work well and add a faint fruit note.
→ Do I need an ice bath for chilling the dough?
No ice bath needed – a quick 20‑minute chill in the refrigerator suffices.
→ Can I add sprinkles instead of coloring?
Absolutely, colorful non‑nutritive sprinkles give a festive look with minimal effort.
→ Is it okay to freeze the dough?
Yes, wrap each colored portion tightly; you can bake directly from frozen, adding a couple of minutes.
Chef's Tips
If the dough feels too soft, return it to the fridge for another 10 minutes.,For an extra sparkle, dust the finished cookies with a light dusting of powdered sugar.,You can swap lemon zest for orange zest for a subtle citrus twist.
Nutrition Facts
per serving
120
Calories
1g
Protein
15g
Carbs
6g
Fat
Taste Profile
A gentle sweet butter flavor with a bright citrus hint
Ingredient Substitutions
Don't have an ingredient? Try these alternatives
Will give a nuttier flavor; reduce liquid slightly
May slightly affect crispness, but works for dairy‑free needs
Recipe Variations
Try these delicious twists on the original
Spicy Version
Add a pinch of cayenne pepper to the dough and finish with a light dusting of powdered sugar for a subtle kick.
Mediterranean Style
Mix a teaspoon of orange zest into the white dough and drizzle with honey after baking for a sweet‑savory twist.
Common Mistakes to Avoid
Learn from others' mistakes for perfect results
- Over‑mixing the dough, which creates a dense texture
- Skipping the chilling step, leading to spreading
- Using too much food coloring, which can affect flavor
Meal Prep & Storage
Make Ahead Tips
You can form the dough logs and freeze them for up to a month; bake straight from frozen, adding an extra minute or two.
Leftover Ideas
Reheat gently in a low oven (300°F) for 5 minutes to revive the soft interior.
Perfect Pairings
Serve this with...
Cooking Timeline
Gather and measure all ingredients, zest the lemon
Cream butter and powdered sugar until light
Add vanilla, zest, salt, then fold in flour
Divide dough, tint portions, roll into logs, and chill
Slice, bake, cool, and store the cookies
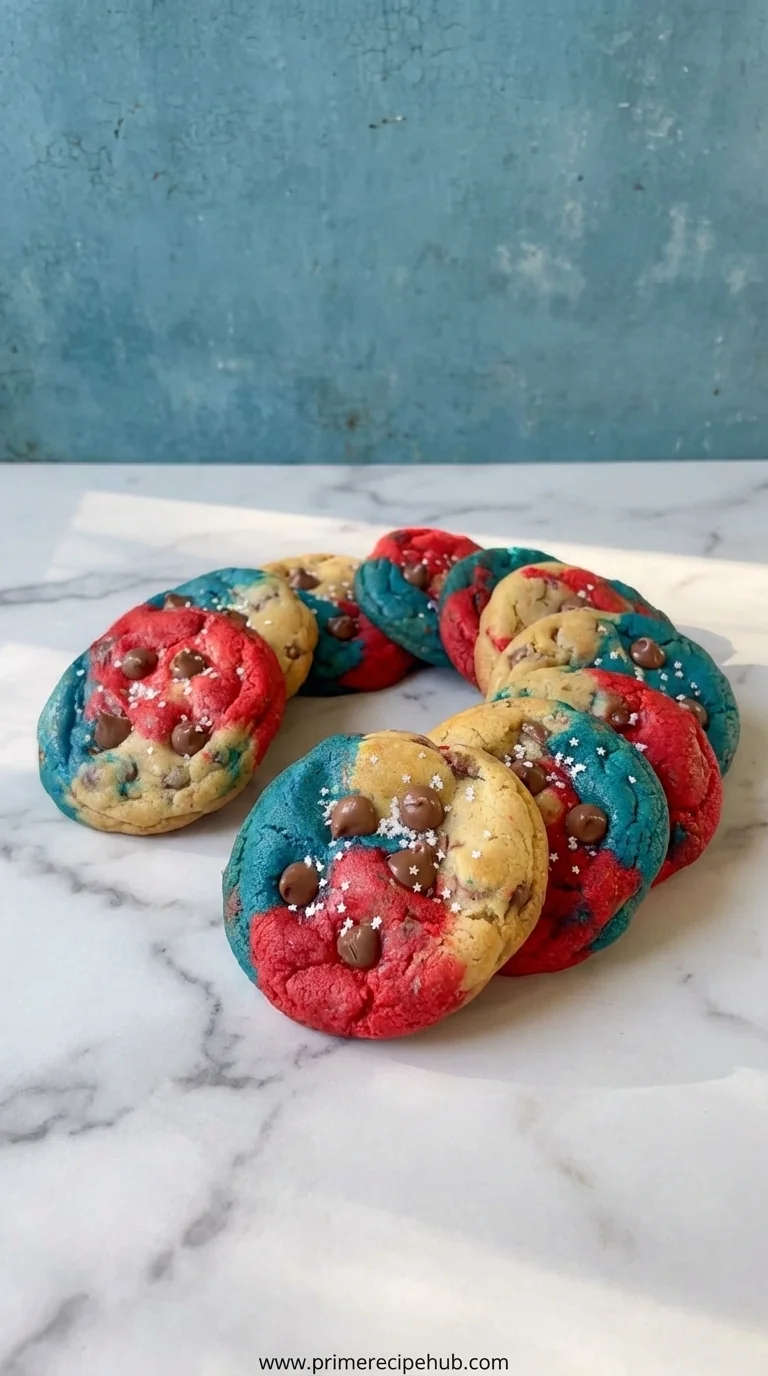
4th of July Cookies Recipe
A festive, buttery cookie that brings together the classic red, white, and blue colors of Independence Day in each bite, perfect for family gatherings and backyard picnics.
Timing
Prep Time
20 Minutes
Cook Time
12 Minutes
Total Time
32 Minutes
Recipe Details
Ingredients
Cookie Dough
- 01 2 1/2 cups all‑purpose flour
- 02 1 cup unsalted butter, softened
- 03 3/4 cup powdered sugar
- 04 1 tsp vanilla extract
- 05 1 tsp lemon zest
- 06 Pinch of salt
- 07 2–3 drops red food coloring
- 08 2–3 drops blue food coloring
Instructions
In a large bowl, cream the softened butter and powdered sugar until light and fluffy, about 2 minutes.
Add vanilla, lemon zest, and salt; mix briefly, then gradually stir in the flour until just combined.
Divide the dough into three equal parts. Tint one portion red and another blue using food coloring; leave the third portion white.
Roll each colored dough into a log about 1‑inch thick, wrap in plastic, and chill for 20 minutes.
Preheat oven to 350°F (175°C). Slice the chilled logs into 1/4‑inch rounds and place on a parchment‑lined baking sheet.
Bake for 10‑12 minutes, until the edges are just set. Cool on the sheet for 5 minutes, then transfer to a wire rack.
Notes & Tips
- 1 If the dough feels too soft, return it to the fridge for another 10 minutes.
- 2 For an extra sparkle, dust the finished cookies with a light dusting of powdered sugar.
- 3 You can swap lemon zest for orange zest for a subtle citrus twist.
Tools You'll Need
-
Mixing bowl
-
Hand mixer or stand mixer
-
Plastic wrap
-
Parchment paper
-
Baking sheet
-
Wire rack
Must-Know Tips
- Don't over‑mix after adding flour, it can make the cookies tough.
- Let the dough chill; this prevents spreading and keeps colors distinct.
- Taste a tiny piece of dough before baking; adjust sweetness if needed.
Professional Secrets
- Room temperature butter emulsifies better, giving a smoother crumb.
- Chilling the dough solidifies the fat, leading to a slight rise and crisp edges.
- Baking on a pre‑heated stone or heavy sheet ensures even heat distribution.

Recipe by
Sophia BennettSophia Bennett represents the artistic heart of sweet baking with her elegant cakes, delicate pastries, and celebration desserts. She enjoys crafting ...
Get Delicious Recipes Weekly
Join 25,000+ home cooks getting our best recipes straight to their inbox.
Free forever • No spam • Unsubscribe anytime